Drawings for fine motor skills
Your baby is growing and you, trying to be good parents, are trying to give him the best: prestigious kindergarten, expensive toys, schools of early development, high-class babysitters. But is it always good for a child? What do you want in return?
And we usually want one thing: what would the child start to speak faster, develop faster, study at school easily, adapt well in any society and could occupy a worthy place in it. Often we are driven by our unfulfilled desires and dreams that we want to embody in our children. But is it really only someone else, only a high-class specialist can give our child more than we do? I do not urge you to go through the whole school program at home. But do we really not have the strength to prepare our children for school?
I believe that a child needs a kindergarten only in a few cases:
- if there is nobody to sit with him;
- if the child has any problems that require the intervention of a specialist, and the parents do not have sufficient funds for individual lessons with a specialist (speech therapist, correctional teachers);
- if in the close environment of the child less than three children of his age are present;
- if the parents themselves are not able to raise their children.
Using kindergarten as the only possible and necessary means for the development of your child is more than incorrect. No tutor, educator, speech therapist or other specialist can develop your child more than you do. You just need to believe in yourself, read a little pedagogical literature, and go!
At preschool age, the closest attention should be paid to the development of fine hand motor skills. First, subtle movements of the fingers develop, then articulation of syllables appears. The development and improvement of speech is in direct proportion to the degree of formation of subtle movements of the fingers. So, on the basis of the experiments conducted and the examination of a large number of children, the following pattern was revealed: if the development of finger movements corresponds to age, then speech development is within the normal range. If the development of finger movements is lagging behind, then speech development is also delayed.
Training manual dexterity also contributes to the development of such necessary skills and qualities as preparing hands for writing (preparation for writing is important at preschool age, and not training for it, because early learning often leads to the formation of incorrect writing techniques), familiarization with elementary geometric forms, the development of spatial thinking, the concept of relativity (more - less, shorter - longer, etc.), manual praxis, artistic perception, the eye gauge, learning communication skills, mindfulness, sidchivosti and t. d.
I bring to your attention a collection of simple exercises that can be included in the games and in the daily routine of your child, and which will help you to avoid problems with the child’s speech, and subsequently with his schooling.
Start development work fine motor skills need from a very early age. Already in infancy, you can massage the fingers, thereby affecting the active points associated with the cerebral cortex. At the age of three or four years you need to perform simple exercises, accompanied by poetic text (for example, "Forty"), do not forget about the development of basic self-care skills: fastening and unbuttoning buttons, tying shoelaces, etc.
The main thing - the level of difficulty of the tasks must match the age. When choosing games and exercises, you must take into account the capabilities and interests of children. Too simple, as too difficult games and exercises do not cause interest in children. As the program material is mastered, the game can be complicated by increasing the number of items for its implementation, changing (accelerating) the pace, replacing the visual material of the game with a verbal one, etc.
If the child has no interest in the lesson, it is better to postpone or replace it with another. Do not interrupt classes for a long time. Do not overload the child, do not seek to give him everything at once! Much does not mean good! Do not do anything through force! Classes should bring joy. Do not try to immediately get results. Even if something did not work out, it is not the result that is important, but the participation and acquired experience (even the experience of failure).
Make up plots in advance, using the child’s already existing experience (fairy tales, poems, trips to the zoo, theaters, etc.). Do not spare money on quality materials and equipment. Create exhibitions of works of the kid. Think through well the day routine of the child.
Tasks for the development of fine motor skills can be included in such household chores as
- rewinding thread;
- tying and unleashing nodules;
- care for cut and fresh flowers;
- metal cleaning;
- water treatment, water transfusion. You can offer to wash the dishes, giving the child plastic objects, or wash clothes (explain and pre-show all the processes: wetting, soaping, rubbing, rinsing, wringing out);
- collecting split images;
- analysis of cereals and so on.
It all depends on you and your imagination. You will succeed!
Work with balls
Equipment: Balls of various sizes, box.
Content: A few balls are placed on the table in front of the child. At some distance from them the box is put. An adult shows and explains how to roll the ball so that it hits the box. First, an adult helps a child with this task, then gradually limits help and ensures that the child performs the task on his own.
Work with cubes
Equipment: Cubes.
- "Track" - laying out a few cubes in a row.
- "Fence" - laying out on the edge of several cubes.
- "Bench" - is built from two cubes and a transverse bar on top.
- "Table" - the transverse plank is superimposed on one cube.
- "Gate" - the cubes are placed perpendicular to the bar. Using the building material, it is possible to propose to build also a cot, a sofa, etc.
Work with dolls, pyramids
Equipment: wooden or plastic nesting dolls, pyramids, boxes of different sizes.
- assemble a pyramid of 5 rings;
- collect 4-5 cubes in one big cube;
- assemble one nesting doll from 4-5.
Work with a basket and balls
Work with lacing
Equipment: Cords of various textures, threads, special cards.
- to stretch a woolen thread consistently through all the holes;
- to stretch a woolen thread, skipping one hole;
- perform the usual lacing, as in the shoe.
The execution of these tasks is preceded by a show and explanation. In the future, the child can be offered to perform various patterns, while respecting the principle of the constant complexity of the task. Lacing is more convenient to train using two sheets of thick cardboard with two rows of holes; the child is given a shoelace with metal tips and is shown how to lace up. Cardboard should be reinforced so that it is convenient to manipulate the cord.
Pierce with an awl or nail a hole in a thick cardboard. These holes must be in any order and represent a geometric shape, pattern or pattern. Let the child embroider this pattern with the help of a large "gypsy" needle and a thick bright thread.
Work with a spray
Equipment: Spray, fleece.
Pencil work
- Rotate the pencil smoothly with the thumb and forefinger of the left and right hand.
- Bust pencil all the fingers of the left and right hands.
- Pencil rotation with the palms of both hands.
- Pinching a pencil between two fingers of both hands (index and middle, middle and nameless, etc.).
Work with a rubber band
Key operation
Equipment: table bell (or its substitute - musical toy, keyboard).
Content: A table bell is placed in front of the child. An adult shows the child that the bell button can be pressed with any finger. The adult asks the child to press the bell alternately with all the fingers. Work can be carried out with various keyboards. toys. You can press the buttons with all fingers in turn, you can touch the keys (one key with one finger). For older children, you can number the keys or place letters of the alphabet on them and combine the development of fine motor skills with literacy and numeracy training.
Working with mosaic
Equipment: mosaic of different types, sample.
- Insert the plate in any hole mosaic.
- Lay out several columns of plates of the same color. A sample that is not removed is given.
- Lay out a simple drawing of mosaic plates, having a sample (monochrome) before your eyes.
- Create your own drawing based on past experience.
Work with beads
Excellent hand develops a variety of stringing. String can be all that is strung: buttons, beads, horns and pasta, drying, etc. You can make beads from cardboard circles, squares, hearts, leaves of trees, including dry, rowan berries.
Materials used: beads of various texture, fishing line, thread, buttons, pasta, drying, shoelaces and other materials (depending on imagination).
Content: An adult puts on the table beads of different sizes, but of the same color (or of the same size, but of different colors, or of different sizes and of different colors). It is proposed to make beads independently, in which large and small beads alternate, either red and blue, or round and square, etc. When performing this task, it is important that the child not only thread the threads through the holes of the beads correctly, but also observe a certain stringing sequence. beads.
You can offer the child himself to come up with material for stringing and pattern.
Paper and Scissors
Making paper crafts is also one of the means of developing the small muscles of the hands. This work captivates preschoolers, contributes to the development of imagination, constructive thinking. Working with paper ends with a certain result, but in order to achieve it, you need to master the necessary skills, show will and patience. It is important that children feel the joy of their own work, feel the faith in their strength and capabilities. This should contribute to and selected in accordance with the age of the task, and encourage adults.
Paper and cardboard can be used to make toys for games with water and wind, Christmas-tree decorations, attributes for plot-role-playing games, games-dramatizations, toys-fun, gifts and souvenirs.
Equipment: Paper of various colors, cardboard, glue, brush, scissors, magazines, pictures, newspapers, foil.
- Make beads. Children cut rectangular sheets of paper into triangles, each of them is twisted in the form of a bead, its end is fixed with glue. The finished beads are strung on a string. All work on the production of beads requires sensory-motor coordination, accuracy, perseverance, that is, qualities necessary for teaching writing.
- Weaving. Weaving has an impact on the education of accuracy, patience, perseverance, the desire to overcome difficulties, to bring the work started to the end, gradually controlling their actions, i.e. all the qualities a child needs for school.
The material for weaving can be bark, bast threads, willow twigs, straw, veneer, as well as paper, thin cardboard, cloth, tape, tape, etc. The child can be asked to fold a sheet of paper in half, make a number of even cuts with scissors, without leaving contour, then cut into thin strips of a different color and in a certain way, observing the pattern, weave them between the cuts of the main part of the rug.
Having mastered the principle of weaving from paper, children themselves begin to invent patterns of rugs, a combination of colors, use this method of weaving in other crafts.
- Origami. Origami - the ancient art of creating all sorts of figures from paper. Currently, it is becoming increasingly popular among teachers and psychologists. And this is not by chance. The origami developmental potential is very high.
Origami theme is very diverse, going from simple to complex. To successfully learn how to make origami toys with children, in game form, you need to learn the notation of blanks (basic forms) and symbols (many books on origami are currently sold). In the future, this will facilitate the manufacture and reduce the time to make toys. For memorizing and fixing basic forms with children, you can use the following games and exercises: “Turn a square into another form”, “Guess what the square has become?”, “Where is whose shadow?”, “Name the correct form”, “Determine the basic form " and etc.
At origami classes, it is effective to use fairy tales, they develop interest, facilitate manufacture and memorization when performing toys, because mechanical tasks (draw a fold line, fold in half, fold a corner to the center) are replaced by meaningful, from the point of view of the plot-game idea, action. As the equipment used paper sheets of different colors and ready-made books on origami technique.
- Applications.
It is necessary to constantly perform the following exercises: symmetrical cutting, scissors cutting out figures from cards. From the cut-out figures children can make compositions - applications. If the child is still small, and you are afraid to give him scissors, let him tear his hands with pictures from a magazine or newspaper - as it will; and you will stick the torn pieces on a clean sheet, giving them some form. It can make a meaningful collage.
You can learn to cut with scissors, the main thing that they were safe, with rounded ends. For a start, it is more convenient to cut out geometric shapes and figures from color magazines, and glue a pencil, to fasten them on a sheet.
The game of cutting out patterns from folded pieces of paper has a remarkable property: no matter how clumsily a child cuts out, you still get a pattern that remotely resembles a snowflake or an asterisk.
Needlework
Handicraft plays a special role in preparing hands for writing: embroidery, sewing, knitting.
Equipment: Shreds, fabrics of different textures, threads, needles, large (gypsy) buttons, thimble.
Content: The first seam that children learn is the seam "forward needle." They try to make the stitches the same, to form a flat contour line. Having mastered this stitch, the children move on to the stitches "at the needle" and "line". In the seam "stitch" stitches converge tightly one to another. The needle is injected where it was removed in the previous stitch. On the front side there is one continuous line, and on the wrong side - a double line.
Having mastered the seams, children can master sewing. Coordination and accuracy of movements develops in the child in the process of sewing buttons. Then the children master the seam "over the edge". With this stitch, they can first sheathe a piece of cardboard (postcard). At first, an adult can prick a row of holes along the contour so that the children can master the way of action with the needle, then the seam is performed independently.
After this task are complicated. An adult may offer to sew the blanks cut out according to the patterns, and then come up with themselves, cut and sew an outfit for a doll or a New Year's costume.
Children first make all kinds of stitches in the air, i.e., imitate the corresponding action of the hand, and then act with a needle and thread.
At first it is difficult for children to learn how to tie a knot on a string. They are taught this by means of feeding movements: rolling beads out of paper, launching small toy tops with the help of fingers. Starting a top requires characteristic rolling movements with fingers that are close to creating a knot on a string.
Introduction
In Russia, for a long time, it was decided to teach a child from an early age to play with his fingers. These were such games as “Ladushki”, “Forty-white-sided”, etc. After washing the baby wiped the handle with a towel, as if massaging each finger separately.
It is proved that the fine work of fingers contributes to the development of speech in children. Therefore, it is very important to develop fine motor skills from a very young age. But it will be boring for a child to do exercises just to turn them into interesting and useful games.
AT recent times on the packages of children's games you can see the inscription: “For the development of fine motor skills of hands”. Many parents have heard about this concept, but not everyone knows how to develop fine motor skills and why it needs to be done.
It is already known that at the initial stage of life, it is the fine motor skills that reflect how your baby develops, testifies to his intellectual abilities. On how cleverly the child learns how to control his fingers at an early age, its further development depends.
Under the term fine motor skills the coordinated movements of the small muscles of the fingers and hands are understood. They are important not only to perform various daily activities, but also to stimulate the development of the child’s brain.
Along with the development of fine motor skills, memory, attention, and vocabulary of your child develop.
Periods of child development at preschool age
Famous Italian teacher Maria Montessori identified three periods of child development:
The development of children's speech (from 0 to 6 years). At this time there are two important events. From 1 to 2.5 years, the child’s vocabulary is rapidly expanding. In 4-4.5 years, he masters the letter (but only under the condition of developed fine motor skills);
The perception of small objects (from 1.5 to 5.5 years). At this age, the child likes to play with buttons, beads, sticks, etc. With the help of such items you can develop the motility of the hands of the child. Just be sure that the baby does not take them into his mouth;
Formation of the simplest self-service skills (from 1 year to 4 years). At this age, the child is taught to dress, eat and perform hygienic procedures.
1. Exercises for the development of fine motor skills are conducted in the complex, starting with the first months of the child's life.
2. In the complex of exercises, try to include tasks for compression, relaxation and stretching of the baby’s brushes.
3. Begin or end your hands massage session.
4. Work on the development of fine motor skills regularly, in accordance with the age and taking into account the level of physical development of the baby.
5. At first, the adult performs all movements with the hands of the baby, and as they master the child begins to make them independently.
6. Carefully ensure that the exercises are performed correctly by the child. If the child is at a loss with the performance of any task, immediately help him: fix the desired position of the fingers, etc.
7. Alternate new and old games and exercises. After the child has mastered simple motor skills, move on to mastering more complex ones.
8. Perform certain movements at the same time as listening to the poem (and then with pronouncing a child).
9. Encourage the creative activity of the child, let him invent some exercises.
10. Conduct classes emotionally, actively, praise the child for success, but do not forget to monitor his mood and physical condition.
Exercises on the development of fine motor skills of hands for children from 0 to 2 years
1. "Forty-white-sided"
First, an adult runs his finger along the palm of a child and says: “Forty cooks porridge.” Then the baby starts to drive his finger along the palm. Complicating the game: on the phrase “this gave”, the adult alternately bends the fingers of the child to the palm, except for the little finger: “But this did not give.” Slightly shaking him, we say with a playful reproach: “You did not carry water ...”, etc.
White-sided
Cooked porridge,
Kids fed.
Gave it
Gave it
Gave it
Gave it
But this did not give:
"You did not carry water,
Did not chop wood
Kashi did not cook,
You have nothing.
2. "Ladushka-crackers"
Take the hands of the baby in your hands and clap your hands. Show the child movement and offer to repeat them.
Ladushki-frets,
Voiced crackers.
Clapped her hands,
Slapped a little bit.
3. "Ladushki"
Read the cake and simultaneously accompany the words with gestures.
Ladushki, ladies!
(Show baby palms.)
Where were you?
By Grandma.
What ate?
Kashka.
What drank?
The mash.
(Clap your hands.)
Kashka Shrove,
Brazhka sweetheart,
Grandma dobenka.
We drank, ate!
Shu - flew!
They sat on the head.
(Raise your hands up, turning your palms left and right, then lower them "house" on your head.)
4. "House"
This is a house.
(Put both palms together.)
This is the roof.
(Join your palms and twist your fingers.)
And the pipe is still higher.
(Lift all the thumbs up without disengaging them.)
5. “Hide and Seek”
Hide-and-seek fingers are playing
Are open
(Raise your palm, spread all your fingers.)
Shut-woo-hush
(Connect your fingers and make a fist.)
6. "Bunnies"
Put all the fingers of one hand on the table.
They went to the meadow,
We got into a small circle.
Once hare, two hare, three hare,
Four bunny, five ...
(Recount the seek.)
We knock paws.
(Knock all the fingers on the table together or separately.)
Knocked, knocked
And tired.
Sat down to rest.
(Bend your fingers into a fist.)
7. “Hello, finger”
Alternately, touch your index, middle, ring fingers and little finger to the thumb.
Hello, dear finger,
That met with you.
8. "Strong fingers"
Bend your fingers and have the baby do the same. Then take him by the fingers and pull them each in his own way.
Massage of palms and fingers for children from 0 to 2 years
Finger massage is very useful for a small child. The fingers are closely connected with the brain and internal organs: the little finger with the heart, the nameless with the liver, the middle with the intestines and the spine, the index finger with the stomach, and the large with the brain.
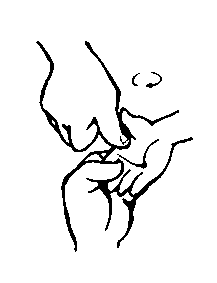 1. Take the baby's palm and carefully massage each finger, starting with the little finger. Perform massage movements from the nail phalanx to the palm, paying attention to each joint.
![]() 2. Massage your baby’s fingertips by lightly pressing them.
2. Massage your baby’s fingertips by lightly pressing them.
 3. Massage your baby’s palms with circular movements of your index finger.
4. Take the palm of the child in your hand and lightly press the thumb to make circular movements in the center of the palm.
 5. Massage your fingers with a circular spiral massager. Put the massager on the baby's finger and massage up and down with your fingers in the same sequence (starting from the little finger).
6. Take two massage brushes and run them on the palms of the child. At the same time his hands lie on his knees, palms up.
Exercises for the development of fine motor skills for children from 2 years
1. "Fisherman"
Pour water into a bowl and throw a few small objects there: cork pieces, twigs, large beads, etc. Offer the kid with a small sieve tied to a stick, take out all these items in turn and put them on the plate on the tray on the right. from the bowl. The "fishing rod" baby should hold with one hand.
2. "Track"
Make a walkway on the table 3-5 cm wide, bounded on both sides by strips of paper. Suggest your child to sprinkle it with semolina or millet. The croup needs to be taken with three fingers and try not to spill over the edges of the walkway.
3. "Magic spoon"
Put two cups on the tray: on the left - a cup with cereal, and on the right - an empty one. Moving the child's hand, show him how to take the cereal with a spoon. Gently bring the spoon to an empty cup and tilt it over. Task: pour all the croup from the left cup to the right.
4. "Sweet tea"
Your baby can already put sugar in his tea. Now teach him how to stir the sugar in the mug.
5. “Salute”
The child takes small pieces of colored paper and tries to break them as small as possible. He puts the torn pieces on a saucer. Then you need to take all the pieces in your palm and throw them up.
6. “Make a Lump”
Give the child a sheet of paper. His task: to crumple a piece so that a dense lump turned out.
7. “Spyglass”
The child takes a sheet of A4 paper and rolls it into a tube with two hands, then brings the tube to the eye and examines surrounding objects into it.
8. "Collect sticks"
Sprinkle counting sticks in front of your child. The kid must collect them all one by one back into the box.
Massage of palms and fingers with a spiky massage ball
1. The ball is between the palm of the child, the fingers are pressed to each other. Do massage movements, rolling the ball back and forth.
2. The ball is between the palm of the child, the fingers are pressed to each other. Do circular movements, rolling the ball over the palms.
3. Holding the ball with your fingertips, make rotational movements forward (as if you are tightening the cap).
4. Holding the ball with your fingertips, push them hard (4-6 times).
5. Holding the ball with your fingertips, make rotational movements backwards (as if opening the lid).
6. Throw the ball with two hands to a height of 20-30 cm and catch it.
7. Clamp the ball between the palms, fingers locked in the “lock”, elbows pointing to the side. Put your hands on the ball (4-6 times).
8. Transfer the ball from one palm to another, gradually increasing the pace.

Exercises for the development of fine motor skills for children 3 years
1. "Labyrinth"
Draw a maze on a piece of paper. Let the kid walk on it with a pencil or just a finger. To make it more interesting for the child to perform the task, you can create a small fairy tale: tell where this labyrinth leads, to whom, who should follow it.

2. "Beads"
A child’s hand is well developed by stringing on a fishing line or a string of buttons, beads, macaroni, dryers, etc. Begin with objects that have a wider opening, so it will be easier for your child to master this task at first.
3. “Walk the path”
Draw on a sheet in a large cell simple track. Ask your child to circle it with a finger, a colored pencil. If the child does this task, draw a more difficult track.
4. "Figures"
From the age of 3, children can already be taught to cut geometric shapes with scissors and stick them on a sheet of paper. It is important that the scissors are with rounded ends, that is, safe.
5. “Surprise”
Wrap the badge in 4-5 candy from candy. Ask the child to deploy all the candy wrappers and carefully fold them.
6. "Clothespins on the basket"
Put a basket with clothespins on the table. Take the clothespin with three fingers and attach it to the edge of the basket. Have a child do the same. After the baby has mastered it, offer him to attach all the clothespins.
7. "Multicolored clothespins"
On the table there is a basket with multi-colored clothespins. Ask the child with three fingers to attach the clothespin of white, red, blue, green ... color to the edge of the basket.
8. “Treat”
Suggest a child to mold treats for toys (drying, donuts, gingerbreads, cookies, candies) from the clay and decorate them with cereals, beads, etc. Cut out small plates from the thick cardboard and ask the baby to spread the prepared treats nicely on them.
Finger games
A very important part of the work on the development of fine motor skills are finger games, which activate the brain of a child, contribute to the development of speech and help prepare a hand for writing.
In the course of these games, children develop dexterity, the ability to manage their actions and focus on one type of activity.
By the age of 5, children are already learning how to perform tasks that require sufficient accuracy and consistency of hand movements.
All the exercises proposed here should be performed at a slow pace, from 3 to 5 times, first with one hand and then with the other hand. Follow the correctness of their implementation. Exercise for a few minutes, 2-3 times a day.
1. "Kitten"
Squeeze and stretch the fingers of both hands.
You, kitten, not food!
Better look for mom.
2. "Squirrel"
Alternately unbend all fingers, starting with the big one. First, do the exercise with your right hand and then with your left.
Squirrel sitting on a trolley
She sells nuts
Chanterelle sister,
Sparrow, titmouse,
Bear to the fat man,
Zainke a mustache.
3. "Tsap-zarap"
The child puts his palm on top of yours. You read the poem, and the baby listens carefully to you. With the words “tsap-scratch”, he has to pull the handle away so that his fingers do not fall into your “trap”. Then another hand comes into play. After some time, you can swap roles.
On the palm, on the track
Walks a little cat,
In small paws
She hid scratches.
If you suddenly want -
Claws hand.
Tsap-scratch!
4. "Funny fingers"
Make a fist. Alternately unbend them, starting with the big one. Then turn the brush left and right 5 times.
Thumb - danced,
Index - jumped,
Middle finger - squat,
Nameless - everything was spinning,
And little finger - had fun.
5. "Fan"
Keep your palms in front of you, fingers pressed (“the fan is closed”). Arrange widely, and then press your fingers together (“open and close the fan”). Wave your brushes at yourself and from yourself (“fan yourself with a fan”) 6-8 times.
6. "Peacock"
Attach all the fingers of your left hand to your thumb. Place the palm of your right hand with your fingers open against the back surface of your left hand (“peacock tail”). Connect and place your fingers ("the peacock opens and closes the tail").
 Have a funny peacock
Fruit basket full.
The peacock is waiting for friends,
For now one peacock.
7. "Butterfly"
Make a fist. Alternately, straighten the little finger, ring and middle fingers, and connect the thumb and thumb into a ring. Straighten your fingers to make quick movements (“butterfly flaps its wings”) - first with one, then with the other hand.
8. “Become charging!«
Turn your fingers to the palm one by one, starting from the little finger. Then, with your thumb, touch everyone else, as if lifting them to the gym. After that, do the exercises - squeeze and release the cam 5 times.
The fifth finger was sound asleep.
The fourth finger - only napped.
The third finger fell asleep.
The second finger - all yawned.
The first finger rose cheerfully
On charging all raised.
Exercises for the development of fine motor skills for children 3-4 years
1. "Cones on a plate"
Suggest a child to ride pine, spruce and cedar cones on a plate. First, let him roll one bump, then two, three, etc.
2. "Circle the subject"
You can encircle everything that comes to hand: the bottom of a glass, an inverted saucer, your own palm, a spoon, etc.
3. "Magic pattern"
Pierce with an awl or nail a hole in a thick cardboard - they must be placed in a certain order and represent a geometric figure, drawing or pattern. Let the baby independently embroider the drawing with a thick needle with a bright thread.
![]()
4. “Sew a Button”
Show the child how to sew a button. After that, let the baby do the same thing under your supervision.
5. "Multicolored snowflakes"
Show your child how to make paper snowflakes. After the baby has cut the snowflake, ask him to color it. Have the child cut out a few more snowflakes and color them too.
6. “String the shoe”
Show your child how to lace up a shoe in various ways. First lace up the boot with it. After the baby has mastered the technique of lacing, ask him to lace up the shoe yourself.
7. "Magic pipette"
Suggest a child to play wizards. On a sheet of paper paints, apply several multicolored spots. Show your baby how to drop only one drop with a pipette. After that, let him drip a drop of water on every colored speck. Then watch with the child how the stain will grow and turn into a pattern.
8. "Little pharmacist"
Tell your child about the work of the pharmacist. Then show him how to use the tweezers to fold and shift the beads from place to place. In the game you can use beads of different sizes.
Massage of palms and fingers with natural materials
For children of 4 years old, massage with the use of pine, spruce, pine cones, walnuts, hazelnuts can be offered.
1. "Twist the bump"
Take a pine cone and place it between your baby’s palms. Ask the child to twist the cone (like a wheel) in different directions for about 2-3 minutes.
2. "Roll the cone"
First, the exercise is performed with one fir cone, then with two. Rotate the bumps between your palms for 1-3 minutes.
3. “Catch a Cone”
Take any bump. Ask the child to throw it up with both hands, and then catch it with both hands. After the baby has mastered this exercise, you can complicate it: toss and catch the lump with one hand; tossing the lump with his right hand, and catching with the left - and vice versa Duration of the exercise is 2 minutes.
4. "Walnut"
Roll a nut on the palm of your right hand, then on the back of the left hand. The duration of the exercise is about 3 minutes.
5. "Peresyat nuts"
Pour a handful of hazelnuts from one hand to another. The duration of the exercise is 1-2 minutes.
6. "Nuts on a tray"
Put a handful of hazelnuts on a tray. Roll the nuts with your palms and the back of your hands. The duration of the exercise is 1-2 minutes.
7. "The Grains"
Here you can use a variety of cereals: buckwheat, rice, millet, etc. And the exercises can also be very different: squeeze the kernels in the cam, pour them from one hand to another, mix in a deep bowl, etc. Duration of each exercise 3 minutes
8. "Tender feather"
Run the pen across the surface of the palms and the back of the child’s brushes. The duration of the exercise is 3 minutes.
We work with plasticine
Here you will need several copies of the figures given in this section. This will allow your child to acquire the skill of accurate work with clay. From his best works you can arrange an exhibition.
You will need a different color clay.
1. "Snowman"
Suggest a child to decorate a snowman with the help of plasticine. Let the kid work and smear his fingers clay, without going beyond the boundaries of the contour of the picture.

2. "Flower-seven-color"
The kid should choose seven colors of plasticine - for each petal of a seven-flowered flower. Make sure that he does not go beyond the boundaries of his contour. If the child does not work, help him.
![]()
We outline around the contour
These exercises are aimed at teaching the child to perform smooth lines, without detaching a pencil from the paper. Suggest your child to circle the drawings on the contour. Let him say what is depicted on them. After that, you can ask the child to color these drawings.
1. "Mushroom"

2. "Bunny"

3. "Hedgehog"

4. "Butterfly"

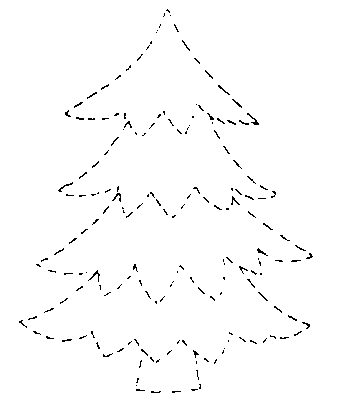
5. "Herringbone"
6. “Autumn leaf”

GAMES WITH CROPS. Take a bright color tray. Scatter the grain (semolina, millet, rice, etc.) over it in a thin layer. Spend the baby finger on the rump - get a contrast line. Let the kid himself "draw" on the rump whatever he wants. After that, start drawing the patterns suggested below. At the first stage, you may need your help, which is to
manipulating the hand of a child. But after a while it's worth checking out - maybe the kid will cope with the task on his own.
Draw on the rump with finger patterns.

GAMES WITH MATCHES. Examine with the baby pictures, laid out of matches. Discuss what they look like. After that proceed to laying out the pictures on the samples. If the child copes well with the task, ask him to put the pictures from the matches from memory. You can come up with their patterns of matches.
Lay out the figures from the matches.


GAMES WITH BEANS AND PEAS. To begin with, the baby can try to lay out the proposed schemes after having printed them out. Then ask him to come up with their own patterns, which can be created with the help of beans and peas. Encourage any kind of fantasy baby.
Lay out the bean and pea paths.

Decorate the drawings with peas and beans.

GAMES WITH ROPE. You will need a medium thick, soft enough rope. This may be a shoelace, a finishing tape. The main thing is that the rope could take the desired shape. As in the previous games, first ask the child to lay out the patterns on the proposed patterns, and then - give free rein to his imagination.
Lay the rope out of the rope.


DRAWING FLOMASTER. A small child is much easier to draw with markers than with pencils. They are easy to hold in your hand, do not require a strong pressure when drawing. Ask your baby to circle the patterns on the points. If necessary, you can take his hand in yours and draw with him. You can think up such activities yourself: draw various zigzag lines and simple patterns on a piece of paper with dots and ask your child to circle them.
Help the animals to get to your favorite food: draw paths with a felt-tip pen.
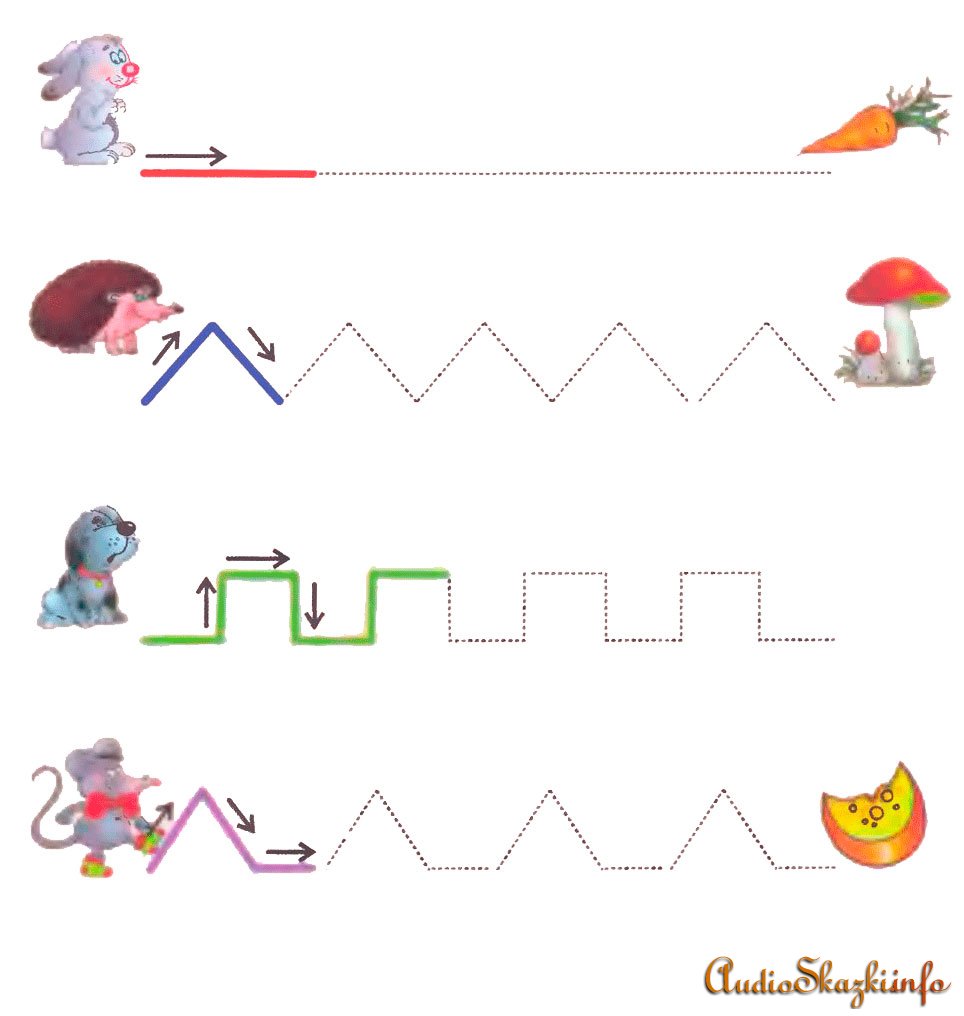

Try to draw on the points the same apple and paint the resulting picture with felt-tip pens on the model.

DRAWING PENCILS. As already mentioned, drawing with pencils is not as easy as it may seem at first glance, so help your kid: control the pencil's pressure on the paper; when painting, make sure that it does not go beyond the outline of the drawing.
Assignments where you want to draw pictures are quite complex. Therefore, do not be upset if in your opinion the child does not perform them well enough. In any case, it is very useful: the kid learns to navigate on a piece of paper, to compare the dimensions.
Draw the strings of the balloons on the points. Color the balls. Who has more balls?

Shade pictures - draw lines with colored pencils.


Try to draw pictures. Color them.

Try to draw a butterfly with both hands at the same time. Circle the patterns on the wings of the butterfly and paint.

DRAWING A FINGER. Before the child learns to paint with a brush, he can be shown how to paint with his own finger. Prepare jars of watercolor or gouache, dip the baby's finger in the paint and let him just leave his "prints" on
blank sheet of paper. After that, proceed to drawing the pictures proposed below.
Dip your finger in the paint and draw a picture.

Dip your finger in the paint and draw Christmas balls on the Christmas tree.

Draw berries with your finger and grapes as shown in the sample.

Draw a flower with your fingers and beads as shown on the sample.

WE MAKE APPLICATIONS. Print the pages on which the details and application patterns are located. Cut out the parts and let the baby stick them in the right places. He will make funny color pictures.
With the help of an adult cut out the body of the fish and glue them.

Cut out and stick colored beads.
Details of applications for cutting.

"Put" in a vase flowers: cut out and stick.

Sticker snowman and snowflakes.

Details of applications for cutting.

Decorating T. Kosheleva